前言
我们在使用RecyclerView时很明显就会发现一个比较显著的特征,那就是他默认没有分隔线的。但是RecyclerView作为比LisvView更强大的控件,肯定会有对分隔线的控制。
上一篇文章中我们提到的常用方法addItemDecoration()方法,就是为item添加装饰,这里的装饰最常用的就是分隔线,但是这并不能满足我们多样化的需求,不过RecyclerView为我们提供了一个抽象类–ItemDecoration,我们可以自定义类去继承该类,自己定义我们的装饰内容。
RecyclerView.ItemDecoration类
我们先看一下在RecyclerView中的ItemDecoration类的源码:
/**
 * An ItemDecoration allows the application to add a special drawing and layout offset to
 * specific item views from the adapter's data set. This can be useful for drawing
 * dividers between items, highlights, visual grouping boundaries and more.
 *
 */
public static abstract class ItemDecoration {

    public void onDraw(Canvas c, RecyclerView parent, State state) {
        onDraw(c, parent);
    }

    @Deprecated
    public void onDraw(Canvas c, RecyclerView parent) {
    }

    public void onDrawOver(Canvas c, RecyclerView parent, State state) {
        onDrawOver(c, parent);
    }

    @Deprecated
    public void onDrawOver(Canvas c, RecyclerView parent) {
    }

    @Deprecated
    public void getItemOffsets(Rect outRect, int itemPosition, RecyclerView parent) {
        outRect.set(0, 0, 0, 0);
    }

    public void getItemOffsets(Rect outRect, View view, RecyclerView parent, State state) {
        getItemOffsets(outRect, ((LayoutParams) view.getLayoutParams()).getViewLayoutPosition(),
                parent);
    }
}
看了一下,这个类还是比较简单的,里面一共有六个方法,准确的来说应该是三个,我们就挨个分析一下这个类中的方法。
onDraw()
onDraw()方法,这个方法相信大家还是比较熟悉的,在这里也应该能猜到是干什么,就是绘制布局。但是后面还有一个onDrawOver()方法,这两个有啥区别呢,我们先看一下onDraw()方法的注释就明白了:
/**
 * Draw any appropriate decorations into the Canvas supplied to the  RecyclerView.
 * Any content drawn by this method will be drawn before the item views are drawn,
 * and will thus appear underneath the views.
 *
 * @param c Canvas to draw into
 * @param parent RecyclerView this ItemDecoration is drawing into
 * @param state The current state of RecyclerView
 */
public void onDraw(Canvas c, RecyclerView parent, State state) {
    onDraw(c, parent);
}
在ItemView绘制之前绘制该装饰布局,所以该装饰内容会出现在itemView的下方(这里不明白的继续往下看)。
我们可以在自定义的类中去实现该方法,实现我们自己的绘制内容。
onDrawOver()
onDrawOver()方法与上面的onDraw()一起看:
/**
 * Draw any appropriate decorations into the Canvas supplied to the RecyclerView.
 * Any content drawn by this method will be drawn after the item views are drawn
 * and will thus appear over the views.
 *
 * @param c Canvas to draw into
 * @param parent RecyclerView this ItemDecoration is drawing into
 * @param state The current state of RecyclerView.
 */
public void onDrawOver(Canvas c, RecyclerView parent, State state) {
    onDrawOver(c, parent);
}
在itemView绘制之后绘制该装饰布局,所以该装饰内容会出现在itemview的上方。
这里就有些区别了,一个是在上面,一个是在下面,究竟是啥意思呢。接着往下看。
getItemOffsets()
/**
 * Retrieve any offsets for the given item.
 * Each field of <code>outRect</code> specifies the number of pixels that the item
 * view should be inset by, similar to padding or margin. The default implementation
 * sets the bounds of outRect to 0 and returns.
 *
 * If this ItemDecoration does not affect the positioning of item views, it should set
 * all four fields of <code>outRect</code> (left, top, right, bottom) to zero before
 * returning.
 *
 * @param outRect Rect to receive the output.
 * @param view    The child view to decorate
 * @param parent  RecyclerView this ItemDecoration is decorating
 * @param state   The current state of RecyclerView.
 */
public void getItemOffsets(Rect outRect, View view, RecyclerView parent, State state) {
    getItemOffsets(outRect, ((LayoutParams) view.getLayoutParams()).getViewLayoutPosition(), parent);
}
获取item偏移量,为什么是偏移量呢,我们可以先看一下下面这张图就会明白:
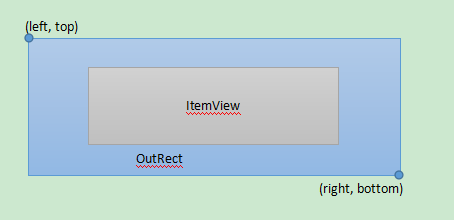
我们的RecyclerView的itemview其实是这样的,只是默认情况下这个outRect的与itemview的间隔即偏移量为0(这个偏移量有些类似于Padding和Margin属性),所以视觉上的感觉就是itemview和outRect重合,但是itemview在上面,也算是itemview覆盖着outRect。
我们可以通过重写getItemOffsets()方法去指定outRect的top、left、right和bottom,来控制各个方向的间隔,达到分隔线的效果。
在这里我们在来解释上面的onDraw()和onDrawOver()方法,比如,我们调用onDraw()方法,先去绘制我们的装饰,然后在绘制itemview,这样,itemview就把我们绘制的装饰给覆盖了(前提是他们的位置有冲突),但是onDrawOver()方法正好相反。
调用
我们在RecyclerView中可以看到一个方法getItemDecorInsetsForChild(),这个方法里面会去调用我们前面提到的ItemDecoration类中的getItemOffsets()方法。我们看一下这个方法:
Rect getItemDecorInsetsForChild(View child) {
    final LayoutParams lp = (LayoutParams) child.getLayoutParams();
    if (!lp.mInsetsDirty) {
        return lp.mDecorInsets;
    }

    if (mState.isPreLayout() && (lp.isItemChanged() || lp.isViewInvalid())) {
        // changed/invalid items should not be updated until they are rebound.
        return lp.mDecorInsets;
    }
    final Rect insets = lp.mDecorInsets;
    insets.set(0, 0, 0, 0);
    final int decorCount = mItemDecorations.size();
    for (int i = 0; i < decorCount; i++) {
        mTempRect.set(0, 0, 0, 0);
        mItemDecorations.get(i).getItemOffsets(mTempRect, child, this, mState);
        insets.left += mTempRect.left;
        insets.top += mTempRect.top;
        insets.right += mTempRect.right;
        insets.bottom += mTempRect.bottom;
    }
    lp.mInsetsDirty = false;
    return insets;
}
然后我们再去追寻这个方法在哪里被调用了,有三个地方,分别是在:
- LayoutManager#measureChild()
- LayoutManager#measureChildWithMargins()
- LayoutManager#calculateItemDecorationsForChild()
都是在LayoutManager类中去调用的,用于测量绘制itemview的布局,这个我们后面再LayoutManager中去介绍。